Garage door cables are key to smooth operation, helping to lift and lower your door. Over time, they can wear out, fray, or break, causing malfunctions.
If your door isn’t working properly, acting fast is important to prevent further damage. This guide will show you how to fix a garage door cable and when to call in a pro.
How to fix garage door cable?
To fix a garage door cable, lift the door manually to release the tension, then use pliers to guide the cable back onto the drum. Re-tighten the springs if needed. If unsure, call a pro!
Key Takeaways
- Garage door cables help balance the weight of the door, and when they break or become damaged, they can cause the door to become misaligned or difficult to operate.
- Replacing a broken garage door cable is a complex and potentially dangerous task that may require professional assistance.
- Regular maintenance and inspection of the garage door system can help prevent cable damage and extend the lifespan of the components.
Understanding Garage Door Cables

Before diving into the repair process, it’s essential to understand the function of garage door cables and how they interact with other components in your garage door system. Whether you’re tackling the issue yourself or seeking garage door repair in Willowbrook, IL, having a clear understanding of these components can help ensure a smoother and safer repair experience.
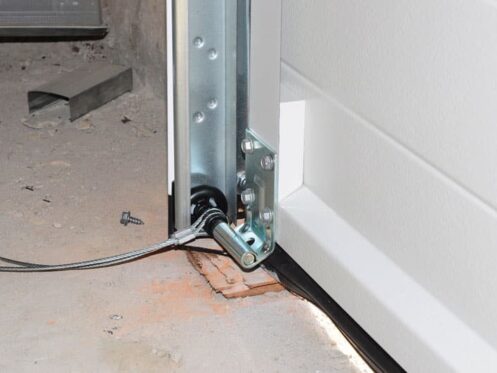
1. What Are Garage Door Cables?
Garage door cables are typically made of high-strength steel and are designed to assist in lifting and lowering the garage door.
They run along the sides of the door and connect to the spring system. When the springs are engaged, the cables help lift the door by distributing the weight evenly.
These cables are essential for the smooth operation of the door, and if they break or become damaged, it can cause the door to malfunction or become unbalanced.
2. Why Do Garage Door Cables Break?
Garage door cables can break or become damaged for several reasons, including:
Wear and Tear: Over time, the cables can become frayed, worn, or stretched from constant use.
Rust: Exposure to moisture can cause the cables to rust, making them weaker and more prone to snapping.
Improper Installation: If the cables were not installed correctly, they may become misaligned or experience unnecessary strain.
Damaged Springs: If the springs become worn or broken, they can put excessive pressure on the cables, causing them to snap.
How to Fix a Garage Door Cable: Step-by-Step Process

Fixing a garage door cable can be a challenging and dangerous task due to the high tension in the system. If you’re not experienced with garage door repairs, it’s best to call a professional.
However, for those who feel comfortable handling the repair, here’s a step-by-step guide to fixing a garage door cable.
Step 1: Disconnect the Power
Before you start working on the garage door, always disconnect the power to the garage door opener to avoid any accidents or injuries.
This will ensure that the door doesn’t suddenly close or open while you’re working.
Tip: Unplug the opener or turn off the power at the breaker to make sure the system is completely de-energized.
Step 2: Release the Tension on the Springs
Garage doors rely on high-tension springs to lift and lower the door. If the springs are still under tension, they can be extremely dangerous to handle.
You will need to release the tension from the springs before attempting to fix the cable.
Tip: Use a winding bar to safely release the tension from the torsion springs. If you’re not comfortable handling high-tension springs, it’s best to call a professional.
Step 3: Remove the Broken Cable
Once the tension has been released from the springs, you can proceed to remove the broken cable.
Start by removing any accessories or obstructions that are in the way of the cable. You’ll likely need to unhook the cable from the pulley system and carefully remove it from the door’s track.
Tip: Make a note of how the cable is threaded through the system so you can properly install the new one later.
Step 4: Install the New Cable
After removing the damaged cable, install the new cable by threading it through the same path as the old one.
Make sure the cable is securely attached to the pulley system and the bottom bracket of the garage door.
Ensure the cable is positioned correctly and that it runs parallel to the door’s tracks.
Tip: Double-check the alignment of the cable to make sure it is running smoothly along the track before proceeding.
Step 5: Re-tension the Springs
Once the new cable is in place, you will need to re-tension the springs to ensure the door operates correctly.
This is the most critical part of the process, as improper spring tension can lead to dangerous situations.
Tip: If you’re unfamiliar with re-tensioning springs, it’s strongly recommended to seek the help of a professional to avoid injury.
Step 6: Test the Door
After everything is reassembled and properly tightened, test the garage door to ensure it operates smoothly.
Open and close the door a few times to check that the cable is functioning as it should and that the door is moving freely without any issues.
Tip: If the door is still malfunctioning or if the cable comes loose, stop immediately and seek professional help.
Frequently Asked Questions
1. How do I know if my garage door cable is broken?
Signs of a broken cable include uneven door movement, a door that gets stuck halfway, or a sagging door. If you notice any of these issues, inspect the cable for damage.
2. Can I fix a broken garage door cable myself?
While it is possible to fix a broken garage door cable yourself, it requires technical knowledge, especially when dealing with high-tension springs. If unsure, it’s best to call a professional.
3. How long do garage door cables last?
Garage door cables can last anywhere from 5 to 10 years, depending on the frequency of use and maintenance. Regular inspection can help extend the lifespan of your cables.
Conclusion
Fixing a broken garage door cable can be a complicated task, but with the right knowledge and tools, it’s possible to do it yourself.
However, if you’re unsure or uncomfortable handling high-tension springs, it’s always best to call a professional to ensure safety and proper function.
Regular maintenance and proper care can help prevent cable issues and ensure your garage door operates smoothly for years to come. For homeowners seeking expert support, Roselle IL garage door installation and repair services can make all the difference in maintaining long-term functionality and safety.

