Noticing drafts or dirt creeping into your garage? Your door seal might be worn out. Replacing it is a quick, effective fix that keeps out moisture, pests, and cold air.
This guide shows you how to replace a garage door seal step by step, with the tools and tips you need for a tight, clean seal.
How to replace a garage door seal?
To replace a garage door seal, remove the old seal from the bottom of the door, slide the new seal into place, and secure it using a hammer or screws, ensuring it fits snugly.
Key Takeaways
- Replacing a garage door seal helps prevent drafts, dirt, and moisture from entering the garage.
- The process is relatively simple and can be done with basic tools.
- The cost of replacement is affordable, and the benefits include improved energy efficiency and a cleaner garage.

Materials Needed for Replacing a Garage Door Seal
Before starting the replacement process, it’s important to gather the necessary materials. Here’s a list of what you’ll need:
- New garage door seal (make sure it matches the size and style of your door)
- Measuring tape
- Scissors or a utility knife
- Screwdriver or drill (if needed)
- Rubber mallet (optional, for ease of installation)
- Cleaning supplies (soap and water, cloth or sponge)
Step 1: Measure the Garage Door and Buy the Right Seal
The first step in replacing your garage door seal is to measure the existing one. Measure the length of the bottom of the door to determine how much new seal you’ll need.
Make sure to purchase a seal that is the right size for your garage door. Most garage door seals come in strips that can be cut to size.
Tip: It’s better to buy a seal that is slightly longer than necessary, as you can always trim it to fit.
Step 2: Remove the Old Seal
Once you have the right replacement seal, it’s time to remove the old one.
Depending on the type of garage door seal, it may be held in place with screws, nails, or simply wedged into the groove. Here’s how to remove it:
Inspect the current seal
Check how the seal is attached. If it’s screwed in, use a screwdriver or drill to remove the screws.
If the seal is wedged into a groove, you may need to use a flathead screwdriver to pry it out gently.
Remove the old seal
Once you’ve loosened the fasteners or pried it out, carefully remove the old seal from the bottom of the garage door.
Tip: Clean the area where the old seal was attached before proceeding with the new installation. This will help the new seal adhere better.
Step 3: Prepare the New Seal
Now that the old seal is removed and the area is clean, it’s time to prepare the new seal for installation.
Most garage door seals come with a specific length or a track system that needs to be fitted properly. Follow these steps:
Cut the new seal to size
If your new seal is too long, use scissors or a utility knife to cut it to the correct length. Ensure the edges are neat and straight.
Check the track or groove
Some seals come with a track that needs to be fitted into the door’s groove. Make sure that the track or groove is clean and free from debris.
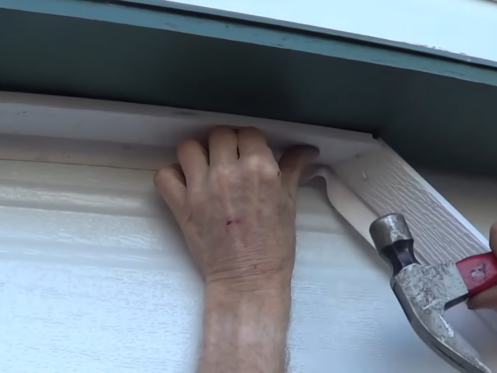
Step 4: Install the New Seal
With the new seal prepared, you can now begin the installation process. Depending on the type of seal you purchased, the installation method will vary.
Track-style seal
If you have a track-style seal, insert the seal into the groove at the bottom of the door. Use a rubber mallet (or tap gently with your hand) to ensure the seal is snugly fitted into the groove.
Compression-style seal
If you have a compression-style seal, simply place it against the bottom of the garage door. It may have adhesive backing, or you may need to use screws to secure it in place.
Secure the seal
Ensure that the seal is straight and fully in contact with the door’s surface. If necessary, secure it with screws or nails, making sure they are placed evenly along the door’s length.
Tip: Double-check that the seal is aligned properly. If the door has a slight curve or the seal doesn’t fit perfectly, it can cause uneven pressure and prevent it from sealing effectively.

Frequently Asked Questions
1. How long will a garage door seal last?
A high-quality garage door seal can last anywhere from 5 to 10 years, depending on the material and weather conditions.
2. Can I replace the garage door seal myself?
Yes, replacing a garage door seal is a relatively simple DIY task. It requires basic tools and some patience to ensure proper installation.
3. How do I know if my garage door seal needs replacing?
If you notice drafts, water leaks, or visible wear and tear on the seal, it’s time to replace it. Regularly inspecting the seal will help you catch any issues early.
Conclusion
Replacing a garage door seal is an easy and cost-effective way to improve the energy efficiency of your home and protect your garage from the elements.
With a few basic tools and the right materials, you can complete this task yourself and enjoy the benefits of a properly sealed garage.
Regular maintenance will help extend the life of the seal, ensuring your garage remains safe, clean, and comfortable.
If you encounter any issues during the installation process or need assistance, don’t hesitate to consult a professional for help.

